Comprehensive guide to the subject of how to make and use adjustable outhauls...
Unlike dinghy sailors, windsurfers like to keep things simple: arms instead of mainsheets, fin instead of rudder, that sort of thing. Unnecessary complications rarely take a hold in our world. This is especially the case when it comes to bits of string. Typically, windsurfers have three bits of string: a long bit for downhauling, and two short bits for the boom. Maintaining these bits of string in reasonable order appears to be challenging enough for most of us, so the idea of adding more string to our rigs seems pretty daft. Unfortunately, in the world of big sails at least, this assumption is seriously misguided. Adding a few extra bits of string, to create an adjustable outhaul system, allows the sailor to fully exploit the potential of a big rig, as this (only slightly dodgy) cycling analogy demonstrates:
Adjustable outhauls are to big sails what gears are to bicycles. They are not essential to the functioning of the machine, but things become an awful lot easier with them in place. If the wind (the incline) picks up a little choose a flatter sail (lower gear) to counter this. Conversely, if the wind lulls (gentler incline) choose a fuller sail (higher gear) to stay at optimum efficiency. And make these adjustments with minimal effort, as many times as you like, on the fly. With an adjustable outhaul in place you will be able to spend less time wallowing or hanging-on, and more time comfortably blasting – whatever level of powered-up-ness that means to you. You will also be rewarded with the ability to point slightly further upwind and go significantly deeper off downwind, if you so desire.
Anyone still sceptical about the benefits of adjustable outhauls should take a few minutes to check out some of the websites of the major sail manufacturers – all of which implicitly or explicitly recommend adjustable set-ups. So, having established that in the world of big sails string is good - who uses big sails and how big is big?
Formula Sailors
Racers are using far bigger sails than ever before. For most Formula racers 11.0 metres is now a "change down" size, and even lighter sailors would rarely rig much below 9 metres. Adjustable outhauls are essential to fully exploit what Formula racing sails have to offer.
Big Freeride Sailors
A growing number of recreational sailors, tired of waiting for perfect ‘proper’ short board conditions, have also invested in bigger kit to increase their time on the water. For sailors like these, and especially inland sailors, bigger sails (8-9m) and wider boards have transformed marginal force 3 to 4 breezes in to decent powered up blasting conditions. There are clear performance advantages to be gained by using adjustable outhaul set-ups with recreational sails of these sizes.
Raceboard / IMCO sailors
This group already use adjustable outhauls to good effect, but then they also use old fashioned sails, sliding mast tracks and daggerboards…
Which sails benefit?
Any sail of 8m or bigger will almost certainly benefit from an adjustable outhaul system. With sails smaller than this, it depends on the style of sail. Any model that can be tuned through a range of outhaul settings (which will include most camber induced sails) will still benefit from an on-the-fly tuning system, down to sizes of maybe 6.0-6.5m. Once you’re much smaller than 6.5m however, it’s really not worth the hassle, as you’re less likely to be interested in the sort of long straight line sailing, with perhaps some upwind and downwind work, which really allows an on-the-fly tuning system to give you something extra. On these smaller sails, the outhaul tension tends to be much more allied to downhaul tension too - if you adjust one, you need to adjust the other. And on-the-fly downhaul adjusting is a whole different ballgame!
SETTING UP YOUR OWN SYSTEM
The instructions that follow describe how to set up a double-sided race-ready outhaul system for optimum on-the-fly tunability. (Note: If your adjustments are likely to be few and far between, a similar but single-sided system would probably suffice. This type of system would be fine for adjusting in response to wind strength changes but inadequate if you are intending to tweak according to the angle being sailed.)
Ingredients
Boom: Some boom ends lend themselves to adjustable set-ups better than others – ideally there should be at least 2 pulleys in the boom end (3 are required with double clew pulley systems). If your boom has insufficient pulleys then extra ones can be bolted or tied on, though with most modern booms this is unlikely to be necessary. Most larger (220cm +) booms, especially carbon models, will have been made with adjustable outhauls already in mind.
2 boomcleats: (e.g. Clamcleat model number CL244, or Nautix ‘V’ cleats) These usually use a plastic collar, tightened by 2 screws, to clamp the cleat on to the boom. Only use clamp-on cleats like this – anything that involves rivets or drilling will severely weaken your boom. Newer versions of the Clamcleat have a hole in the middle for rope to pass through and be secured with a knot. Older versions have no hole and expect you to secure the rope by tying it directly on to the boom. Nautix cleats differ from Clamcleats in that the cleating part is rotated ninety degrees, so the cleat faces out even when mounted on the top of the boom.
2 small pulleys:
2 bits of 5mm diameter rope (from here on, I’ll refer to this just as the ‘outhaul rope’): These are going to be the bits of rope you pull – so choose decent rope that is easy to grip. Judging the length of rope required is something of a black art (see next section).
1 bit of thin elastic shock cord – the springier the better: Again, difficult to judge the exact length required, but 150cm should be sufficient.
1 bit of thin diameter rope (from here on, the ‘tail-section line’): Depending upon the system being set up the tail-section rope will lead through (or around) the clew of the sail once or twice.
Braided spectra (or the core from "Excel Racing", or similar) is a superior alternative to normal rope here. Such high performance fibre lines are very low friction, don’t stretch, and are very strong. Either buy core only or strip the outer from a sheathed rope.
Rope Lengths
The lengths of all the bits of string you need will depend upon numerous factors. It might seem obvious that any correctly set up system must allow for the full range of outhaul tensions to be selected. However, for the racer this may not be enough. During a race, outhaul is overwhelmingly released from one side (usually the starboard side), and tensioned from the other side (usually the port side), so it would be easy to use up all the available rope before the race has finished. Racers therefore need to be able to perform several adjustment repetitions (release on port, tension on starboard, release port, tension starboard…etc) during the same race. To maximise the number of potential adjustment repetitions the outhaul ropes therefore need to be long (also, before the start, the racer should deliberately unbalance the system to ensure that there was plenty of rope to pay out on the starboard side / pull in on port).
So, to maximise adjustment repetitions, the outhaul ropes need to be long. Taking this to an extreme, with the ropes fully released, this would leave the pulleys just short of the end of the boom. In practice such a wide range of adjustment is probably unnecessary and has the undesirable consequence of creating an excess of rope mast-side of the cleats when in use. If the pulleys reach half to two thirds of the way to the end of the boom, measuring from the cleats (to determine cleat position see later), this will usually suffice.
Before reaching for the knife also consider the following:
Other sails? Make sure the ropes are not too long if the boom is also to be used with smaller sails. Likewise, try to not to unduly restrict the adjustment range for bigger sails.
Sail Clew fittings
The standard stainless steel eyelet fitting is best suited to having the tail-section line passing through it once only. This gives the tail-section a 2:1 advantage (4:1 when combined with the rest of the system). If you’re serious about getting the maximum efficiency for your system, you could always purchase the Chinook double outhaul pulley (see separate section) which allows a low friction 8:1 system even with traditional eyelets.
If your sail has an integrated pulley block type system, this works best with the tail-section line passing twice around the clew, giving a 4:1 advantage (8:1 combined).
(Remember that an 8:1 system, although more powerful, offers half the number of adjustment repetitions available with a 4:1 system. Using longer outhaul ropes with an 8:1 system would go some way towards compensating for this disadvantage.)
So, to calculate the outhaul rope length it is necessary to double the maximum potential distance from boomcleat to pulley, and then add the extra needed for knots, and then add a little bit more so that there is still some rope left to grab even when the outhaul is fully paid out. To cut down on guesswork, if using boomcleats with an integrated rope fixing (e.g. new style Clamcleats): double the maximum potential cleat to pulley distance and add 43cm. If using cleats that require the outhaul rope to be tied to the boom: double the maximum potential distance and add 67cm. Also remember that two bits of rope this length are required – one for each side of the boom.
Having settled on the length of the outhaul ropes, the tail-section line length almost decides itself. The actual length will depend upon the outhaul rope lengths, boom length and tail-section line route (2:1 or 4:1 system), amongst other things. Also bear in mind other sails to be used with the same boom - bigger sails will need a longer line. In practice the tail-section line is left long enough to accommodate the biggest sail and simply tied off shorter for use with smaller sails.
With so many variables at work here it is probably best to make a generous educated guess for the amount of tail-section line required – the excess can always be trimmed later.
INITIAL SET UP
Step 1
Decide where to put the boomcleats. Most folk position their cleats between 50 and 60cm back from the midpoint of their harness lines. The cleats should be just within reach of your back hand when you pull your upper body in towards the boom. If the cleats are too far away releasing the outhaul will be difficult. Too close and you might accidentally grab the cleats during gybes.
Some people prefer their cleats facing directly up towards the sky, other people prefer them angled slightly out.
Make sure the cleats are ‘looking’ the right way (rope passes through from back towards front), and clamp them in place (same position on each arm). Depending upon the diameter of your boom you may need to use the spacers provided in the Clamcleat pack (fin cover material can be used as additional spacer material, if required).
Step 2
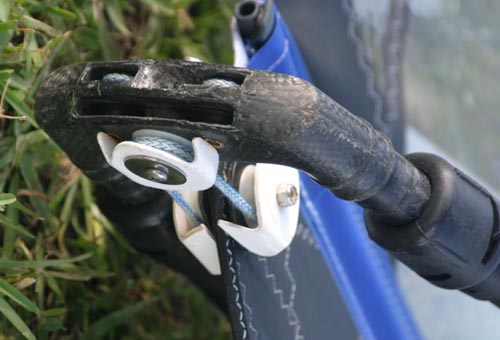
As previously covered in the section ‘Rope Lengths’, the length of the outhaul ropes will depend upon a number of factors. For the new style Clamcleats pass the rope through the hole and finish with a figure-of-eight. If securing directly to the boom use a clove hitch with an extra half hitch in the bight for security (pic 2). In both cases the knots should end up facing out to avoid potential damage to the sail. (If you don’t know your reefs from your grannies visit http://www.netknots.com to swot up.)
Next thread the free end through a mobile pulley and then back though the jaws of the cleat. Add a figure-of-eight knot about 20 cm before the end. Now do the same to the other side of the boom.
Step 3
Correctly downhaul the sail and clamp the boom in place. Now take the tail-section line and secure an end to one of the mobile pulleys using a small bowline (pic 3). Then route the free end in a 2:1 or 4:1 purchase system (pic 4) according to the boom end and clew fitting being used (with spectra type lines first wrap the ends in PVC tape to make this less fiddly). Tie off the tail-section line at the other mobile pulley block with a bowline.
The position of the knot will require some judgement on your part. Have a play with pulling the outhaul through the cleats to test the adjustment. As a general rule of thumb, if there seems to be an excess of outhaul rope mast-side of the cleats, then the tail-section line has been tied off too long. If it is easy to run out of rope to pay out it has probably been tied too short. Remember to leave the tail-section line long enough to accommodate the biggest sail to be used with the boom.
Step 4
All you need to do now is join up the loose ends of each side of outhaul rope with springy elastic (pic 1). This is useful to stop the ropes wrapping themselves around the boom tubes whilst you are on the water. Make a very small bowline in the elastic, pass the outhaul through the loop and then add a half-hitch to prevent the elastic slipping off. Lead the elastic round in front of the mast (above the boom clamp) and complete the outhaul loop in a similar fashion. With the sail set at medium fullness the elastic should be totally limp. Only with extreme fullness in the sail should the elastic be under a minimal tension.
Subsequent Rigging and Derigging
Once you have your system set up like this rigging and derigging is a breeze, especially if you have remembered (or better still marked) how long the boom needs to be and at what length to tie off the tail-section line. Rigging times should be similar, and may be reduced for sails with a double clew pulley fitting.
To de-rig a sail with a traditional clew eyelet:
1. Undo the half hitch in one of the outhaul ropes and slip off the elastic - this breaks the ‘outhaul loop’, preventing the elastic from tensioning the system, and makes the next step much less fiddly.
2. Untie one end of the tail-section line from its mobile pulley and unthread from the boom end and sail’s clew.
3. Remove boom and finish derigging.
Reverse this process for rigging, finishing by rejoining the outhaul rope with the elastic to complete the loop.
To de-rig a sail that uses a double clew pulley fitting:
1. (if necessary, break the ‘outhaul loop’ as just described)
2. unhook the loops of tail-section line from the clew fitting.
3. Remove boom and finish derigging.
Rerigging is self-explanatory – only if rigging a different sail might the knot position on the tail-section line need to be adjusted.
On the water
Adjusting the outhaul changes the shape of the sail, and the differences this can make to the sail’s performance and handling characteristics are dramatic.
Release the outhaul and the sail becomes deeper with more belly, and the leading edge becomes blunter. Good news for creating a powerful engine for heading off downwind, or for keeping planing when the wind lulls. In fact, for going deep downwind the outhaul can be eased until the back half of the sail lays along the boom, or maybe even bags slightly over it. With more power it will be easier going broader downwind. Increased depth in the draft will also keep the sail pulling evenly, and make it less ‘twitchy’(sensitive to sheeting angle), so ease the outhaul even if going downwind when it is windy.
A common misconception is that it is best to fully crank on the outhaul again when going upwind, but this isn’t necessarily the case. For most sails, optimum shape for upwind performance is still quite full (on formula sails the belly maybe just brushing the boom). Too much depth though and the blunted angle of attack will have a detrimental effect upon upwind pointing angle – so a balance has to be found. In stronger winds control issues start to become a greater concern and a flatter, less powerful sail may be necessary. A flatter sail upwind will make strong gusts significantly easier to manage and limit the risk of being ‘dumped’.
So, in a nutshell, most of the time aim to sail with a fairly full sail for maximum power. If just beam reaching up and down then just set the sail to the desired power level and only tweak it when the wind or your mood changes. Flatten the sail off as the wind comes up, and/or to reduce drag for absolute maximum speeds. Fill ’er out for more grunt. For cruising or racing set the sail for the angle you are sailing. To sail downwind add depth to the sail for power, constant pull, and also an elastic foil that reacts well as the board bounces around off chop. Coming back upwind, take some of the shape out of the sail, and significantly reduce draft depth is sailing overpowered.
Adjustment technique
With a little practice, actually adjusting the outhaul is no more difficult than changing gears on a bicycle. Particularly if the set up is good, then operation should be quick, smooth and elegant. Continuing with the bicycle analogy, just as it is best to select new gears with the pedals turning, it is best to adjust the outhaul whilst you are actually sailing. Sailing here means properly sailing - both feet in straps and relaxed in to the harness. Your back hand is thus free to make adjustments. To release the outhaul simply grab hold of the rope about half a metre in front of the cleat and lift it upwards, maybe with a slight jerk to help it release. Now let the rope feed through the cleat as the wind pulls extra depth in to the sail. Once the desired draft has been obtained let the rope re-engage in the cleat by bringing the rope back down to the level of the boom. Finished. The whole operation takes a second or less and has a negligible impact upon board trim. The most important thing to remember is to let the wind pull shape in to the sail - if the cleat is released with no power in the sail (say, after having uphauled) then nothing will happen!
Tensioning the outhaul is marginally more difficult because the wind in the sail works against you. It is therefore easiest to momentarily depower the rig to some extent to apply outhaul – this is achieved by sheeting the sail out. Again, only attempt adjustment from a starting point of comfortably planing in the straps and harness.
The preparation stage sees both hand positions change in readiness for the actual adjustment. Reach further forward with the front hand and grab the boom nearer the mast. Then with the back hand release the boom and get a good grip on the outhaul rope just in front of, and next to, the cleat. The upper body will have to move in slightly towards the boom to accommodate the new hand positions, but board trim is largely unaffected so there is plenty of time to find a position that will be easy to pull from.
The adjustment stage needs to happen much more quickly. Pull the mast in towards your upper body with the front hand (think of bringing your head in towards the boom clamp) and swing your weight slightly forwards and inboard. These actions sheet out and depower the rig. Without delay (almost simultaneously) haul in on the back hand, firmly gripping the outhaul rope, directly along the boom. Think of pulling your hands in towards each other – the use of both arms will make it easier to apply sufficient tension. Provided the outhaul has been pulled along the boom (through, as opposed to out, of the cleat) the rope will automatically re-engage in the cleat as soon as you stop pulling.
The sail should be depowered for as brief a time as possible and the actual adjustment part (whilst the sail is sheeted out) should take only around a second. Speed is important because with the sail sheeted out the board will rapidly start heading up in to the wind and slowing down - take too long and there is a danger of dropping off the plane or falling in backwards as the rig loses power. It is important to be ready for and aware of this potential hazard – and not to spend too long with the rig sheeted out (unless you actually want to head upwind anyhow – as racers do when they adjust their outhauls whilst rounding a leeward mark).
The effort required to apply outhaul will vary upon the sail size being used, the wind strength, the ratio and friction of the outhaul system being used, and the degree to which the sail is sheeted out during the manoeuvre. Other things being equal, an 8:1 system will be easier to pull than a 4:1 system, so there may be less disruption to board trim. Even if using a 4:1 system, unless sailing in massively overpowered conditions, sailor strength really isn’t an issue.
So there you have it. A whole heap easier (and cheaper) than fitting a set of gears to your bike, but giving you much the same benefits. What are you waiting for?
 me he comprado material de formula y la botavara me ha dejado con dudas en su sistema de poleas, no veo claro como se hace el montaje con el sistema de poleas,¿¿ me podriais pasar fotos o videos de alguien montando alguna vela de formula?? las explicaciones me vendrian bien pero no creo que me entere hasta que lo vea
 ![[aiba]](/foro/smilies/aiba.gif "aiba [aiba]")
![[saludo]](/foro/smilies/saludo.gif "saludo [saludo]")